 Article
Wooden Rings
“Love is summer’s promise, like a ring it has no end”
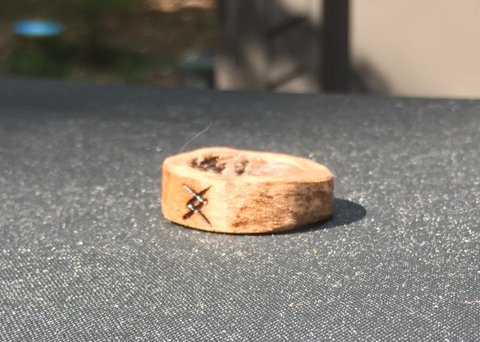
 The ring blank is easy to create. If you can find any small pieces of hard wood, that works the best for the hardiness of your project. With the piece of hardwood (and with the supervision of an adult), use a drill to cut a hole in the wood. (The size of the drill hole is based on the size of your finger.) Once you have the hole cut in the middle of your piece of wood, you will want to cut around it into a square. The square should be approximately 1.5 inches on each side. (If you are using a jigsaw, you can round the edges to make the sanding easier). From here, you are ready to start the sanding process!
Notes before Sanding:
· Sand in an open area, away from nice linens or clothes. Sanding makes sawdust as the sandpaper removes wood from the rings and will cover the area you’re working around.
· If you have a power palm sander, please ask an adult to help supervise.
Sanding
Using the lowest grit sandpaper, begin removing material around the ring. The easiest way to do this is to clamp the sandpaper to a strong work table, gritty side up, and run the ring back and forth across the sandpaper. This lets you use your body weight to grind off the material. (If you don’t have a clamp, just hold the sandpaper with one hand on the table and the ring with the other.)
The lower the grit number, the more wood will be removed with each stroke. Focus first on the sections with the most amount of wood, or areas where the ring is most blocky.
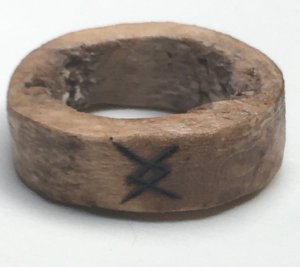
Once your blank begins to look more like a ring, focus on getting it into uniform thickness. It should be a little thicker than your desired final product, since we have more sanding to go!
Switch to a the medium grit, and work around the ring until each surface feels identical. Make sure to sand the inside of the ring, which you can do by rolling up the sandpaper and passing it back and forth through the ring interior. If you’d like, sand the sides of the ring to make it thinner, but make sure to round off the edges.
Switch to the final grit, the highest number. Sand until you reach the smoothness you’d like your ring to be! For a highly polished feel, dab a bit of mineral oil (available at any drug store) on the ring and sand around the ring. This uses the sawdust coming off the ring as extra grit for polishing!
Staining/Finishing
This is all up to you! Applying a stain or finish will add a layer of water and wear resistance to your ring, as well as making the natural grain of the wood appear more vibrant.
If you want to add a little color to your ring, but still see the wood grain, a stain is your best bet. A variety of colored finishes are available at your local hardware store. Some stains do not include waterproofing, so read the back of the can to see if you need a waterproofing finish as well.
Finishes typically do not add a color to the wood, instead they add a layer of oil to the wood which protects it from moisture. We recommend you use tung oil for your rings, but this can require multiple coats. Polyurethane finish is a simple option for time and money, but doesn’t give the same luster as multiple tung oil coats.
Follow the directions on the back of the can or bottle for the best result. Apply the finish in an area with good ventilation, since the fumes can make you light headed. Cover the working table with a cloth or cardboard to make sure the stain or finish doesn’t ruin it.
Things to be careful of
· Wood swells when wet, so take the ring off if you’re going swimming or working around water
· Do not shove the ring on your finger, it should be able to easily fit.
o If it is too tight to do this, simply sand more on the inside of the ring
If your ring gets stuck on your finger (and you can’t get it off with soapy water)
Get an adult to help you with this:
1. Place a hard surface underneath your hand, like a table or countertop
2. Rest your hand palm down on the hard surface, fingers spread, with the ring pressed against the surface
3. Using a hammer or similar tool, gently tap straight down on the ring
a. Do Not Slam the hammer! A gentle to moderate tap should crack the ring
4. This will crack the ring open, with the force of the hammer being redirected up by the splitting ring